
Top Three Things to Know About 4-Post Sliding Shelves
Posted by NavePoint on Apr 21st 2021
Sliding shelves have been gaining popularity in the networking infrastructure market as cabinets become less of an “install and forget” and more of a “continuous improvement” type project. Sliding shelves add sophistication to a cabinet setup in terms of overall organization. Often, they are an afterthought or a final piece to a project. However, without proper planning, installing sliding shelves at the end of a system build can be frustrating and time-consuming.
Pros and cons of 4-Post sliding shelves
Functionally, 4-Post sliding shelves provide a platform to mount non-rackmount-able equipment while allowing for forward-movement access when desired. Sliding shelves are often used to mount computer accessories such as a monitor, keyboard, mouse, or KVMs. It goes without saying that the sliding motion is the biggest benefit of a sliding shelf. Furthermore, due to its 4-Post structure, sliding shelves have decent weight capacities but the max load is lower than the fixed 4-Post shelves because of the extra torque on the sliding rails when the shelf is slid out.
When compared to other shelves, the main drawback of sliding shelves is the installation challenge. We will discuss how to install sliding shelves later in this blog.
How to choose a 4-Post sliding shelves
The top five things to consider when choosing a sliding shelf are rack space, load capacity, mounting depth, shelf extension, and internal usable space.
4-Post sliding shelves generally take up a rack unit. Make sure you plan for the space your equipment will need when being placed on top of the shelf.
NavePoint’s sliding shelves have an industry average weight capacity of 99 pounds. The shelf can handle more weight if you never pull it out, but that defeats the purpose of buying a sliding shelf.
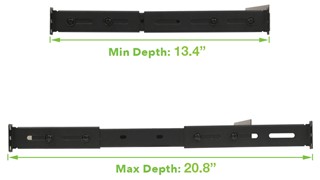
Like any 4-Post rack accessories, matching the accessory’s mounting depth to your rack/cabinet’s mounting rail depth is important. All sliding shelves from NavePoint have adjustable mounting depth, but make sure your mounting depth requirements are within the range.
The longer the shelf extension, the higher the load the sliding rails will need to support. Although longer shelf extensions may sound better, NavePoint recommends buying only the extension that you need for two reasons. First, rackmount sliding shelves are designed to stop at full extension, so make sure you have enough room to support the offset while still maintaining an ergonomic posture. Second, with comparable weight capacities, longer shelf extension means higher performing sliding rails or a higher-priced sliding shelf.
The last thing to check before buying a sliding shelf is its internal usable space or shelf space. Different shelf designs may have different sliding rails. Some sliding rails are thicker, therefore, less usable width is left on the shelf space.
Installation of sliding shelves
The best way for us to describe the installation process would be by showing you an example:
Step 1- Loosen the flange nuts along the sides of the rails and adjust the overall length of the rails to fit the depth of the rack/cabinet. Tighten the flange nuts again once set properly.
Step 2 - Locate the numbered square openings in the mounting rails where you plan to install your shelf. You will install cage nuts into the square openings to provide an attachment point for the mounting screws. From the inside of the mounting rail, insert one of the flanges of the cage nut through the square opening. Press it against the side of the square opening. Each flange should engage one side of the square opening, not the top or bottom. Compress the cage nut at the sides slightly to allow the remaining flange to fit through the square opening. When the cage nut is properly installed, both flanges will protrude through the square opening and will be visible on the outer surface of the mounting rail.
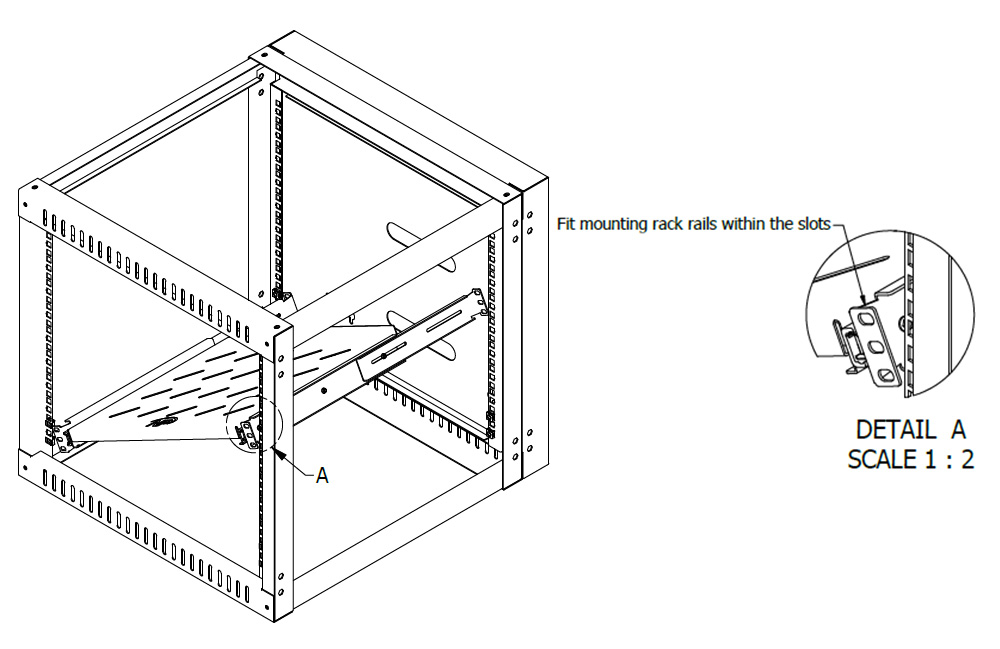
Step 3 - Slide the shelf in the rack/cabinet by angling the sliding shelf by nearly 30 degrees. You will need roughly 6U of space to install the shelf.

Step 4- (Referencing Detail, A) Align/fit the mounting rack rails within the slots for all four corners on the sliding shelf. Rotate to lower and mount the shelf to the front and rear rails of the rack/cabinet using the included mounting hardware.
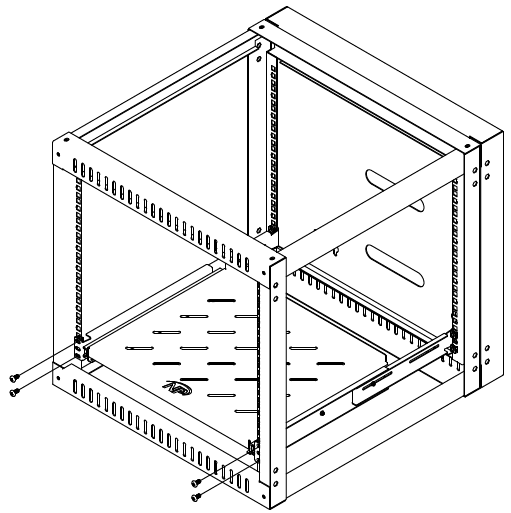
Step 5 - Use the included mounting screws and plastic washers to secure your shelf to the rack rail.
Note: Make sure you leave room for extra cable length to accommodate for the sliding motion.
Summery
By installing a sliding shelf after your rack is fully populated could lead to tasks to disassemble and disconnect six rack unit’s worth of equipment. It could be frustrating if you did not plan ahead. Overall, a sliding shelf is a useful and popular rack accessory that is proven by many installers. If you are interested in the products used in our example, check out NavePoint 9U Hinged Open Frame Wall-Mount Network Rack 22in Depth and NavePoint 1U Vented Sliding 4-Post Adjustable 14" - 16" (350mm) Deep.
Contact NavePoint’s sales or customer service team at 888-505-1363 to learn more about how we may be able to help with your specific need!
Copyright © 2021 Infinite Electronics International, Inc. All Rights Reserved.